This is a cute frog themed birthday card that I made today. This card is for my sister n law who has a birthday coming up on July 4th. She really loves gardens and frogs. I fell in love with this Cricut image and had to cut him out.
Hope you like the video. Make sure you visit my channel and subscribe.
Have a good evening.

Showing posts with label birthday. Show all posts
Showing posts with label birthday. Show all posts
Saturday, July 1, 2017
Thursday, January 26, 2017
[ VIDEO ] Another Masculine Birthday Card and Upcoming Coffee and Crafts Episode
Hey everyone!!!! How is everyone doing??? I have been busy. Working on mini albums, cards, all kinds of things.
The first order of business is that I am planning a live YouTube stream on Saturday February 11th about 10:00 AM EST. I will be putting together the Close To My Heart Welcome Wreath. You have to check this out.


The first order of business is that I am planning a live YouTube stream on Saturday February 11th about 10:00 AM EST. I will be putting together the Close To My Heart Welcome Wreath. You have to check this out.
For details, you can click here
You will find 4 ways to get this wreath kit at the above link. Order yours now and have it by Feb 11th. Then we can make our wreaths together.
Now for the next thing for tonight's post.... I had to make a card for my oldest son who turned 29 this past Monday. You will find the picture and video below.

Tuesday, January 3, 2017
[Video] Birthday Card For My Youngest Son
Good evening. Here is a card that I made for my son for his birthday. His birthday was New Years Eve
Friday, August 26, 2016
[ VIDEO ]50th Birthday Card
Good morning everyone.
I know it has been a while since I posted. I have just had several projects that kept me busy for a while. One of the things is a skill share class that I did. It is a free class. I made a Christmas Card. Here is the link... http://skl.sh/29g6fOc It is free for a limited time.
Now for today's card.... Video is below

Saturday, April 16, 2016
[ VIDEO ] Birthday Card Using A Double Stencil Technique
Good morning everyone... ooops it is almost afternoon. Where did the time go?????
I played this morning in my craftroom. My other half and older step son went out to Powerline Park in St Clairsville OH for their spring open. So, they loaded up the Can Am Commander side by side and off they went for the day. Probably the only kid appropriate event at that park.

Anyhow, Here is a card that I made this morning using a technique that I learned on Stamp Nation called double stencil technique. The video is a little longer because I didn't do any speeding up of the video.

Products Used:
Tsukineko Full-Size StazOn Multi-Surface Inkpad, Timber Brown
CTMH White Daisy Ink
Craft Card Stock
White Ribbon
Upcoming CTMH Stanp of The Month for May 2016
Versamark Ink
Ranger White Embossing Powder
Tsukineko Full-Size StazOn Multi-Surface Inkpad, Timber Brown
Here is the video
Saturday, March 26, 2016
Happy Birthday Card With Partial Die Cutting
Good morning everyone...
I wanted to share this cute card that I made this morning. It is a Z fold card with a partial die cutting technique that I learned from Jennifer McGuire on YouTube. I did not record a video of this since it was my first try at it and I did mess it up and had to start again. I was on the phone and doing this and the first card, I cut one of the flowers on the wrong side of the fold.


I wanted to share this cute card that I made this morning. It is a Z fold card with a partial die cutting technique that I learned from Jennifer McGuire on YouTube. I did not record a video of this since it was my first try at it and I did mess it up and had to start again. I was on the phone and doing this and the first card, I cut one of the flowers on the wrong side of the fold.

Here is what I did
First, I used one of CTMH white daisy card bases. I lined it up on my desk mat and put a very light pencil line down the middle of the front of the card.
I used one of our Spring Time Wishes thin cut dies (sold out) and layed them half way across my pencil mark. Taped the die in place. When I ran it through my Big Shot, I only put the top plate over the right side of the card front. That gave me a partial cut.
I erased my pencil lines. I stamped the partial die cuts with the matching stamp set, SpringTime Wishes with our black archival ink. being careful to line up the stamp on the cut. I used clear embossing powder and heat embossed. This was to insure that when I colored the images, the ink would not run and stay in the lines.
I colored the flowers using Designing With Gelatos Colors Kit- , The inside I used a piece of Confetti Wishes (retired) paper from my little sample package of B & T paper that was on a ring. The sample paper was large enough to avoid the hole and I was able to cut to size. On top of that I used White Daisy to write a sentiment. I inked the white paper with Pacifica ink.
The Happy Birthday Sentiment, I stamped 3 times along the outside edge using Just To Say Stamp set from the Cricut Collection. NOTE: only available in this stamp set. Used Pacifica, Thistle and Honey inks.
I felt it needed a little more on the front. Seemed plain. I took white sequins from the Coral Reef pack (discounted right now - get them while they are still available) and used Pacifica Shinhan Twin Tip Marker (this color is no longer available) and colored the sequins to match the card. Then used Bitty Sparkles in the centers.
I almost forgot, I took a piece of that Confetti Wishes paper and put it on the inside of the Z fold behind the flowers to cover up an oopsie when I got some ink on that panel.

This is the inside of the card. And there you have it. If you are interested in any of the products used, just click the links in my instructions or go to my Close To My Heart Store.
This post does contain an Amazon Affiliate Link which I may earn a small commission
Monday, March 21, 2016
[Video] Happy Birthday Card Using Seaside Paper
Good Morning.
I just uploaded a video of making a birthday card using a retired paper pack which I have a ton of... Seaside B & T paper pack. I had gotten the bulk pack last year and it has been sitting in my collection. I have only used a couple sheets so far. I wanted to use something from my stash. I have so much of this paper that if you are interested in any of it, I will sell it for $1 per sheet plus flat rate shipping, no matter how many sheets you want. Just send me an email.

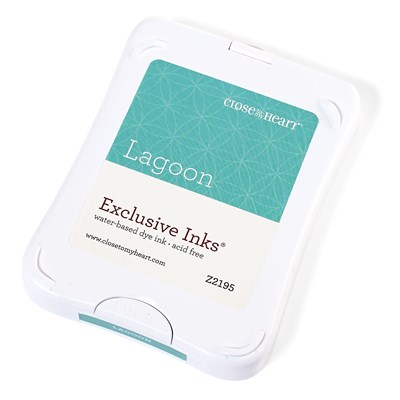
What I forgot to mention in the video is that I used the Lagoon Ink to ink up the edges of my card pieces.
Products Used:
Seaside Paper Collection (Retired)
Happy Birthday Sentiment (Retired - was the Stamp of the Month April 2015)
1 1/2" Circle Punch
2" Scallop Circle Punch
I just uploaded a video of making a birthday card using a retired paper pack which I have a ton of... Seaside B & T paper pack. I had gotten the bulk pack last year and it has been sitting in my collection. I have only used a couple sheets so far. I wanted to use something from my stash. I have so much of this paper that if you are interested in any of it, I will sell it for $1 per sheet plus flat rate shipping, no matter how many sheets you want. Just send me an email.

What I forgot to mention in the video is that I used the Lagoon Ink to ink up the edges of my card pieces.
Products Used:
Seaside Paper Collection (Retired)
Happy Birthday Sentiment (Retired - was the Stamp of the Month April 2015)
1 1/2" Circle Punch
2" Scallop Circle Punch
Entered into the following Challenges
Saturday, January 30, 2016
VIDEO: Masculine Birthday Card Using CTMH Urban Background and Texture Paper Pack
Good Saturday everyone!!!
I am here today with another card that I made. I meant to post this last weekend but had gotten busy. This card was made for my brother n law who just celebrated his birthday yesterday. It was a very quick and easy card.

Here are the products that I used to create this card.
Z1928 Durable Triangle Studs
Z1921 Neutral Metallic Bakers Twine
B1419 Joyful Birthday Occasions Stamp Set
Stamp set from Blossom Workshop On The Go (Retired)
X7204B Urban Background and Texture Paper Pack
Inks: Z2111 Chocolate and Z2164 Sorbet
Here is the YouTube video
Wednesday, January 7, 2015
Frozen Themed Elsa Birthday Card on my Cricut Explore
Good Evening.
I am up pretty late today. It is 11:40 PM right now. I just finished a birthday card. It was fun yet tedious at the same time. I read and saw on YouTube that printing some of the images from the Disney Frozen Cricut Cartridge was easier than trying to cut them and piece them together. Which way do you think I went? I took the hard road. I cut Elsa at 4" and even at that size it was a job putting her together.
I popped her up on pop dots along with the snowflake by her hand. I added a couple other snowflakes. They were intricate cuts too. I cut the first part of the sentiment and the last part I wrote it out with my Explore and colored in the letters with a blue metallic Recollections bold tip marker. I bought these markers then realized they were bold tipped when I got the home and won't work in my Explore.
The last thing that I did was used 2 colors of Stickles glitter glue. I used mainly Crystal on her dress and the snowflakes in her hair. I used Waterfall on the other snowflakes and on a couple dots on her dress. I inked the edges of the white layer with a blue ink chalk. I tried to get the light to catch all the sparkle. It got some of it. But below you will find my card.
Saturday, January 3, 2015
Brithday Card For My Brother-n-law
I happen to be playing with my beloved Explore this morning and I made this card for my brother-n-law. I cheated and didn't make it from scratch. It was in the make it now projects. I added stickles to the candle flames to add something more to the card. I inked the edges of the banner as well. His birthday is coming up at the end of the month. I know that I have plenty of time, but I just love playing with my toy.

Monday, December 29, 2014
Cricut Explore Monkey Birthday Card
Good morning
Just wanted to share a card that I made. I have been playing with my Explore quite a bit since Christmas morning and having a blast. I LOVE THIS MACHINE!!!!
This card, I found a monkey card in the image library in Design Space. I didn't have to do any welding. I wanted to make a shaped card. This made it easy. But I got to use the pen to write with my Explore and use the score stylus. It isn't the best card that I have made in my crafting experience but it was fun and I thought it was a cute card.
Monday, October 6, 2014
My Mom's Birthday Card
Hello Bloggers!
Today I am posting a birthday card that I made for my mother. Her birthday is coming up here shortly but we celebrated early. We took her and my dad to see an Elvis impersonator. That was for her birthday and it included dinner. So, she already has her card.
 I used a deep brown base for the card and layered purple card stock and then Halloween colored plaid designer paper on top of that. I had some white lace that I sprayed with a brown glimmer mist. I added a little bling on the lace. The stamp is of a standard poodle. My parents have had these poodles for many years. I used a paper flower and 2 polymer clay roses that I made.
Today I am posting a birthday card that I made for my mother. Her birthday is coming up here shortly but we celebrated early. We took her and my dad to see an Elvis impersonator. That was for her birthday and it included dinner. So, she already has her card.
Friday, January 28, 2011
Birthday Card For My Son
Good afternoon... I am feeling a little better. My doctor ordered me not to go to work today so I stayed home and made my son a birthday card. His birthday was last week end but just got his address this week. He is in basic training at Parris Island in the Marine Corp.
This card is being entered into the weekly sketch challenge at Card Patterns Challenge Blog
The Sketch

Here is my entry.

The Recipe:
This card is being entered into the weekly sketch challenge at Card Patterns Challenge Blog
The Sketch

Here is my entry.

The Recipe:
- Cardstock from JoAnn's
- Pattern Paper Created By Me (Marine Corp Logo) in PhotoShop CS
- Camo Ribbon from JoAnn's
- Stamp Sets From Annie's Attic Stamp Club
- Color Box Chocolate Ink
- Clear Embossing Powder for Sentiment
- White and Brown Color Pencils
- Fisker's Border Punch
- Round Punches
- ATG Gun (Yah.. got to use it again.)
Thursday, January 14, 2010
New Card For Sketches4all Ning Group
Good day everyone... it has been a busy couple months with the holidays and now I am trying to catch up on school and many other projects. But I did this card for my boyfriend's father's birthday which is tomorrow. I decided to make his card for a current challenge going on at http://sketchesforYou.ning.com/group/monthlychallenge.
It is a A2 gate fold card. I got some nestabilities for my birthday and used the scallop circle to cut on the cuttlebug and emboss. Then I cut a circle and stamped the turtle which is from Inkadinkado. It is a collection with several birthday sentiments. Colored the image with color pencils. I used a 3D glue square to give it some dimention.
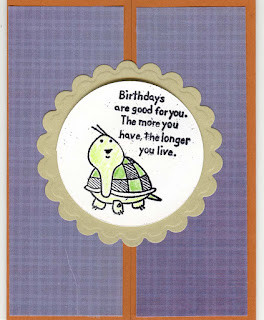
It is a A2 gate fold card. I got some nestabilities for my birthday and used the scallop circle to cut on the cuttlebug and emboss. Then I cut a circle and stamped the turtle which is from Inkadinkado. It is a collection with several birthday sentiments. Colored the image with color pencils. I used a 3D glue square to give it some dimention.

Subscribe to:
Posts (Atom)